Camera on Ubuntu 24.04
This guide covers camera usage on Ubuntu 24.04 using libcamera. For Ubuntu 20.04, see the Camera - 20.04 guide which uses the Qualcomm QMMF stack.
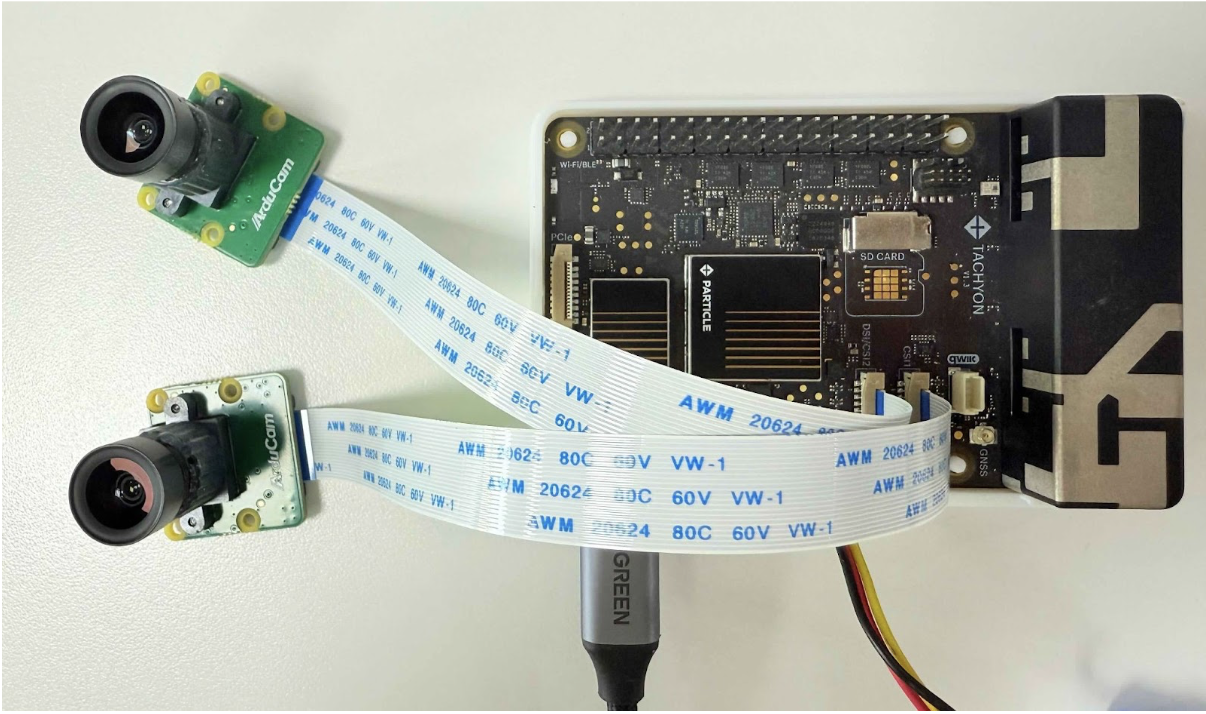
This guide walks through setting up CSI cameras on Tachyon using libcamera and GStreamer. While we use the IMX335 sensor as our example, the principles apply to other MIPI CSI cameras.
By the end of this guide, you'll have:
- Real-time camera preview (GStreamer)
- JPEG photo capture (single frame with auto-exit)
- MP4 video recording (H.264 encoded, timed auto-stop)
Core pipeline: V4L2 (CAMSS) → libcamera (simple pipeline) → ipa_soft_simple (software ISP) → GStreamer (libcamerasrc)
Prerequisites
1. Flash Ubuntu Desktop v1.1.32 or Later
Ensure you're running a recent Tachyon Ubuntu 24.04 desktop image:
particle flash --tachyon /path/to/tachyon-ubuntu-24.04-RoW-desktop-1.1.41.zip
2. Configure Device Tree Overlays
CSI cameras require device tree overlays to be loaded at boot. This tells the kernel how to communicate with your specific camera sensor.
Mount the userdata partition and create the overlay configuration:
mount /dev/sda10 /mnt/userdata
mkdir -p /mnt/userdata/boot && cd /mnt/userdata/boot
nano overlays.txt
Add your camera overlays (example for IMX335 on both CSI ports):
overlays=qcm6490-tachyon-camera-imx335-csi1.dtbo
qcm6490-tachyon-camera-imx335-csi2.dtbo
sync
Copy the overlay files from the device's boot overlays directory:
adb shell cp /boot/overlays/qcm6490-tachyon-camera-imx335-csi1.dtbo /mnt/userdata/boot
adb shell cp /boot/overlays/qcm6490-tachyon-camera-imx335-csi2.dtbo /mnt/userdata/boot
Reboot. On success, you should see log messages like:
Found 'userdata' partition 0:10 block size=4096/4096
Read overlay '/boot/qcm6490-tachyon-camera-imx335-csi1.dtbo' size=3628
Processing overlay 'qcm6490-tachyon-camera-imx335-csi1.dtbo': 0
3. Use Xorg (X11) for Better Stability
GStreamer's video sinks have better compatibility with Xorg than Wayland on this platform. Using Wayland may result in display errors or failed pipelines when previewing camera output.
Verify your session type:
echo $XDG_SESSION_TYPE
Expected output: x11. If it shows wayland, select "Ubuntu on Xorg" at the login screen.
4. Verify Camera Recognition
Check that the kernel recognizes your camera:
v4l2-ctl --list-devices
You should see your camera listed among the video devices.
Quick Start
Follow these steps in order to get your camera working.
Step A: Install Dependencies
First, connect to a network. You can use ethernet over USB, or connect to WiFi:
nmcli dev wifi connect "wifi_name" password "your_wifi_password"
Install the required packages:
sudo apt update
sudo apt install -y \
  git build-essential meson ninja-build pkg-config \
  python3 python3-pip python3-setuptools \
  python3-ply \
  qt6-base-dev qt6-base-dev-tools \
  libqt6opengl6-dev \
  libjpeg-dev libtiff-dev \
  libdrm-dev libgbm-dev libevent-dev \
  libglib2.0-dev \
  libgstreamer1.0-dev \
  libgstreamer-plugins-base1.0-dev \
  gstreamer1.0-tools \
  gstreamer1.0-plugins-good \
  gstreamer1.0-plugins-bad \
  gstreamer1.0-plugins-ugly \
  gstreamer1.0-libav
Step B: Build and Install libcamera
We build libcamera from source to enable qcam (the Qt-based camera application), which is disabled by default. This also ensures GStreamer integration is properly configured.
Clone and build libcamera:
git clone https://git.libcamera.org/libcamera/libcamera.git
cd libcamera/
mkdir -p build

meson setup build \
  --prefix=/usr/local \
  -Dpipelines=auto \
  -Dipas=simple \
  -Dgstreamer=enabled \
  -Dtest=true \
  -Dcam=enabled \
  -Dqcam=enabled

ninja -C build
sudo ninja -C build install
sudo ldconfig
Step C: Configure Environment Variables
Add libcamera to your environment:
export PATH=/usr/local/bin:$PATH
export LD_LIBRARY_PATH=/usr/local/lib/aarch64-linux-gnu:/usr/local/lib:$LD_LIBRARY_PATH
export GST_PLUGIN_PATH=/usr/local/lib/aarch64-linux-gnu/gstreamer-1.0:$GST_PLUGIN_PATH
export LIBCAMERA_IPA_PATH=/usr/local/lib/aarch64-linux-gnu/libcamera/ipa
Add these exports to your ~/.bashrc to make them permanent.
Step D: Configure udev Permissions
By default, the DMA heap devices have restrictive permissions. Configure udev rules to allow regular users to access the camera without sudo.
Check current permissions:
ls -l /dev/dma_heap* /dev/dri/renderD* 2>/dev/null
You'll likely see:
crw------- 1 root root 249, 1 Jan 7 08:14 /dev/dma_heap/reserved
crw------- 1 root root 249, 0 Jan 7 08:14 /dev/dma_heap/system
1. Add your user to required groups:
sudo usermod -aG render,video $USER
2. Create udev rules for persistent permissions:
sudo tee /etc/udev/rules.d/99-camera-dmaheap.rules >/dev/null <<'EOF'
SUBSYSTEM=="dma_heap", KERNEL=="system", GROUP="render", MODE="0660"
SUBSYSTEM=="dma_heap", KERNEL=="reserved", GROUP="render", MODE="0660"
SUBSYSTEM=="misc", KERNEL=="udmabuf", GROUP="render", MODE="0660"
SUBSYSTEM=="drm", KERNEL=="renderD*", GROUP="render", MODE="0660"
EOF
3. Reload udev rules:
sudo udevadm control --reload-rules
sudo udevadm trigger --subsystem-match=dma_heap
sudo udevadm trigger --subsystem-match=drm
sudo udevadm trigger --name-match=udmabuf || true
4. Verify permissions:
ls -l /dev/dma_heap/system /dev/dma_heap/reserved /dev/dri/renderD128
ls -l /dev/media0 /dev/video0 2>/dev/null
id
Log out and log back in (or reboot) to activate group membership before proceeding.
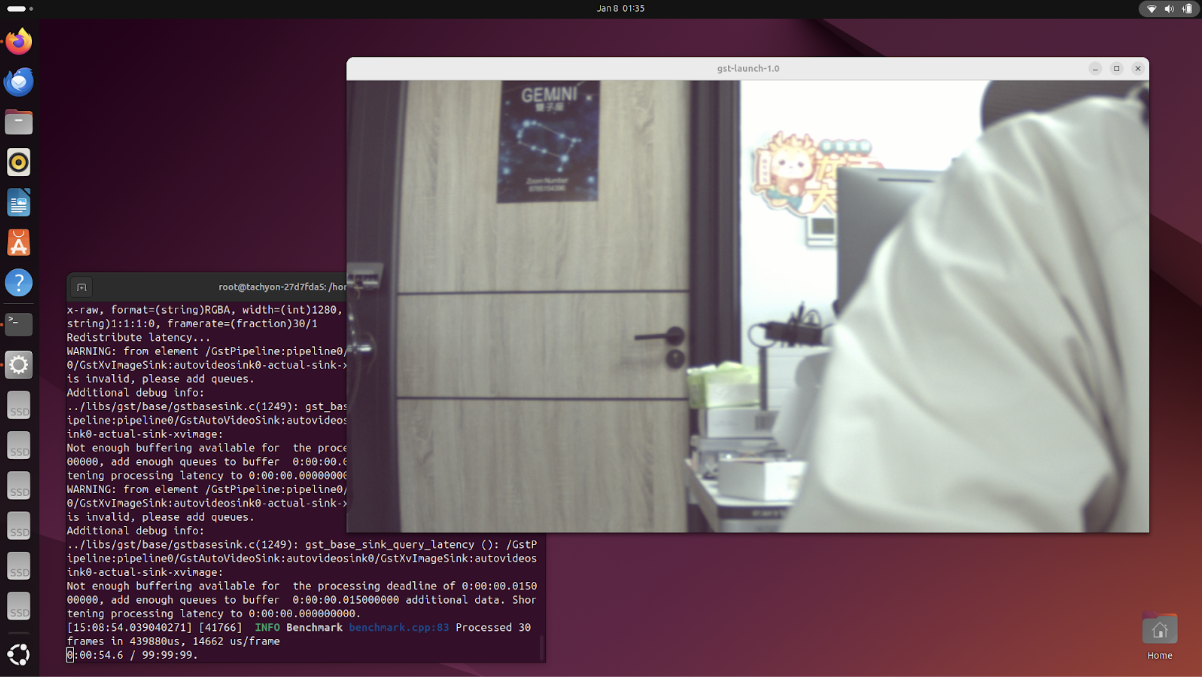
Step E: Validate the Setup
Test that everything works with a live preview:
gst-launch-1.0 -v \
  libcamerasrc \
  ! video/x-raw,format=RGBA,width=1280,height=720,framerate=30/1 \
  ! videoconvert \
  ! autovideosink
List available cameras:
cam -l
Example output:
Available cameras:
1: 'imx335' (/base/soc@0/cci@ac4b000/i2c-bus@0/camera@1a)
2: 'imx335' (/base/soc@0/cci@ac4a000/i2c-bus@1/camera@1a)
To use a specific camera, specify it by name:
# CSI1 (camera 1)
gst-launch-1.0 -v \
  libcamerasrc camera-name="/base/soc@0/cci@ac4b000/i2c-bus@0/camera@1a" \
  ! video/x-raw,format=RGBA,width=1280,height=720 \
  ! videoconvert ! autovideosink

# DSI/CSI2 (camera 2)
gst-launch-1.0 -v \
  libcamerasrc camera-name="/base/soc@0/cci@ac4a000/i2c-bus@1/camera@1a" \
  ! video/x-raw,format=RGBA,width=1280,height=720 \
  ! videoconvert ! autovideosink
You can also use the Qt-based camera application:
qcam --renderer=gles --stream pixelformat=YUYV,width=1280,height=720
qcam --renderer=gles --stream pixelformat=YUYV,width=1920,height=1080
Usage Examples
Live Preview
Basic preview at 720p @ 30fps:
gst-launch-1.0 -v \
  libcamerasrc \
  ! video/x-raw,format=RGBA,width=1280,height=720,framerate=30/1 \
  ! videoconvert \
  ! autovideosink
Capture a Photo
Capture a single frame using the cam utility:
cam --camera=1 --capture=1 --orientation=rot180 --file=photo.ppm \
  --stream role=viewfinder,width=1280,height=720
Convert to JPEG:
ffmpeg -y -i photo.ppm photo.jpg
Capture RAW/DNG format:
# Camera 1 (CSI1)
cam -c1 -C1 -s role=raw,width=2592,height=1944 -Fframe_raw.dng

# Camera 2 (CSI2)
cam -c2 -C1 -s role=raw,width=2592,height=1944 -Fframe_raw.dng
Record Video
Record H.264 encoded MP4 video:
gst-launch-1.0 -e \
  libcamerasrc \
  ! video/x-raw,format=RGBA,width=1280,height=720,framerate=30/1 \
  ! videoconvert \
  ! x264enc tune=zerolatency bitrate=4000 speed-preset=ultrafast \
  ! h264parse \
  ! mp4mux \
  ! filesink location=video.mp4
Record for a specific duration (20 seconds) with live preview:
timeout -s INT -k 5s 20s \
gst-launch-1.0 -e -v \
  libcamerasrc \
  ! video/x-raw,format=RGBA,width=1280,height=720,framerate=30/1 \
  ! videoflip method=rotate-180 \
  ! videoconvert \
  ! tee name=t \
    t. ! queue ! autovideosink \
    t. ! queue ! x264enc tune=zerolatency speed-preset=veryfast bitrate=4000 key-int-max=30 \
      ! h264parse ! mp4mux faststart=true \
      ! filesink location=video_20s.mp4
This pipeline:
- Captures video from the camera
- Rotates 180 degrees (adjust as needed)
- Splits the stream: one branch for live preview, one for recording
- Records for exactly 20 seconds with proper file termination
Troubleshooting
DMA-buf / DMA-heap Permission Issues
Symptoms:
Could not open any dma-buf providerdma-heap allocation failure
Solution:
- Ensure udev rules are in place (see Step D above)
- Verify your user is in the
renderandvideogroups:id - Log out and log back in to activate group membership
MP4 File Won't Play
Cause: The mp4mux element didn't receive an end-of-stream (EOS) signal, leaving the moov atom incomplete.
Solution: Always use:
- The
-eflag with gst-launch-1.0 (ensures EOS on interrupt) timeout -s INTto send SIGINT for graceful shutdown
Single Frame Capture Doesn't Exit
Cause: The pipeline continues running instead of stopping after one frame.
Solution: Use identity eos-after=1 in GStreamer pipelines to trigger EOS after a single frame, or use the cam utility with --capture=1.
"Configuration file 'imx335.yaml' not found for IPA module 'simple'"
Cause: libcamera's Image Processing Algorithm (IPA) module doesn't have tuning data for your specific sensor.
Status: This is a known limitation. The camera will still work but may not have optimal color/exposure tuning. Creating sensor-specific YAML tuning files is an area for future improvement.
Camera Not Detected
- Verify device tree overlays are loaded (check boot logs)
- Ensure the camera ribbon cable is properly seated
- Check
dmesg | grep -i imx(or your sensor name) for driver messages - Verify with
v4l2-ctl --list-devices