Setting up your M-Hat and Raspberry Pi
The M-Hat uses the Raspberry Pi Cellular Tethering Blueprint to configure both the Particle SoM firmware and the Raspberry Pi in one consistent, reproducible flow. The Blueprint is an open-source reference design that includes the SoM tethering firmware and a setup script that configures the Raspberry Pi's network stack automatically.
This guide uses the Raspberry Pi Cellular Tethering Blueprint. The Blueprint is open source - you can fork and extend it from GitHub.
The tethering firmware is required to enable cellular tethering. Flashing generic firmware on its own will not enable tethering.
Prerequisites
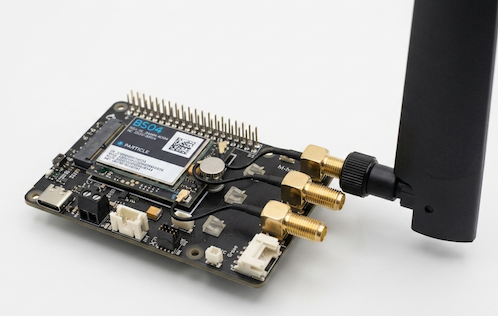
- M-Hat with a supported Particle M.2 SoM seated and secured with the M.2 thumbscrew. For tethering, the SoM must support LTE Cat 1 - see Supported Hardware for details.
- Raspberry Pi 4 or 5 running Raspberry Pi OS Bookworm
- USB-C PD power adapter - see Power Guide
- Data-capable USB-C cable (not charge-only)
- A Particle account with the SoM claimed
- Device OS 6.2.1 or later on the SoM
Step 1 - Assemble the Hardware
- Seat the SoM into the M-Hat's M.2 slot at a 45° angle, press down until flat against the board, and secure with the included thumbscrew.
- Connect an antenna to the SoM's cellular U.FL connector. A cellular antenna is required - the SoM will not connect to the network without it. You have two options:
- U.FL antenna (included with the SoM) - connect directly to the SoM's U.FL connector
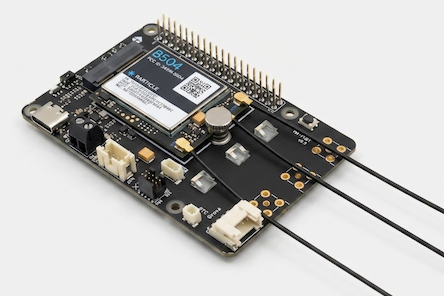
- External SMA antenna - solder the SMA to U.FL adapter to one of the mounting locations provided on the M-Hat, then connect the U.FL end to the SoM's U.FL connector
- U.FL antenna (included with the SoM) - connect directly to the SoM's U.FL connector
Step 2 - Flash the Tethering Firmware to the SoM
Connect the M-Hat's USB-C port to your computer (not the Raspberry Pi's USB-C port). This gives your computer USB access to the SoM for programming.
Navigate to setup.particle.io/?app=particle-blueprint-rpi-tethering to claim your device and install the tethering firmware automatically. The web setup handles all firmware configuration including auxiliary power and UART setup.
If you'd like to review the tethering firmware source code or build it yourself, it is available at github.com/particle-iot/blueprint-rpi-tethering/blob/main/src/main.cpp.
Disconnect the USB-C cable from the M-Hat.
Step 3 - Mount the M-Hat on the Raspberry Pi
- Power off your Raspberry Pi completely and disconnect all power.
- Align the M-Hat's 40-pin connector with the Raspberry Pi's GPIO header.
- Press the M-Hat down firmly until fully seated - it should sit flush with no gap.
If you are using a PoE HAT, it must go below the M-Hat, directly against the Pi. The PoE HAT requires both the dedicated 4-pin PoE connector next to the Ethernet jack and the 40-pin header - both of which pass through the M-Hat's extended connector.
Verify the HAT power direction jumper on the bottom of the M-Hat is set to 5V_OUT (default) if the M-Hat is powering the Raspberry Pi. See the Power Guide for the full explanation.
Step 4 - Connect the Battery and Power On
- Connect the included 3-cell LiPo battery to the M-Hat's battery connector.
- Power the M-Hat using one of the following sources:
- USB-C PD (recommended) - connect a USB-C PD-capable adapter to the M-Hat's USB-C port
- DC IN - connect a 5-12V DC supply to the screw terminals
- PoE HAT - if a PoE HAT is stacked below, set the power direction jumper to
5V_IN
Do not connect both the M-Hat USB-C and the Raspberry Pi USB-C at the same time. See the Power Guide.
The USB-C PD LED will light up when Power Delivery is successfully negotiated. The Particle RGB LED will cycle through startup states. When breathing cyan, the SoM is connected to the Particle Cloud and tethering is active.
Step 5 - Install Raspberry Pi Dependencies
On the Raspberry Pi, install the required packages:
sudo apt update
sudo apt install -y ppp modemmanager network-manager
| Package | Purpose |
|---|---|
ppp | PPP daemon; creates /etc/ppp/ structure used by the setup script |
modemmanager | Detects and initializes the cellular modem over UART |
network-manager | Creates and manages the particle GSM connection that auto-connects on boot |
Note: raspi-config is pre-installed on Raspberry Pi OS and is used by the setup script to disable the serial console.
Step 6 - Run the Tethering Setup Script
Run the following single command as root on the Raspberry Pi:
sudo bash <(curl -sL https://part.cl/tethering)
The script is hosted at https://part.cl/tethering. You can inspect it before running.
The script automatically:
- Detects the Pi model and selects the correct UART device (
ttyS0for RPi 4,ttyAMA0for RPi 5) - Enables UART with CTS/RTS hardware flow control in
/boot/firmware/config.txt - Disables the Linux serial console on that UART to free it for PPP
- Configures PPP options in
/etc/ppp/options.<TTY> - Creates ModemManager udev rules to detect the SoM at 921600 baud
- Creates a NetworkManager GSM connection named
particlewith APNparticleand auto-connect enabled
To print the script version:
curl -sL https://part.cl/tethering | bash -s -- --version
To revert all changes made by the script:
sudo bash <(curl -sL https://part.cl/tethering) --disable
The script does not currently support RPi 3 and will exit with an error. By default on RPi 3, the full-featured PL011 hardware UART (ttyAMA0) is claimed by the onboard Bluetooth module, leaving the GPIO14/15 pins mapped to the mini UART (ttyS0). The mini UART has two problems for tethering at 921600 baud: (1) its baud rate is derived from the VPU core clock, which can vary with CPU frequency scaling, causing baud rate drift; (2) it lacks hardware CTS/RTS flow control, which the tethering setup requires. Documentation for RPi 3 will be added once tested.
Tested on Raspberry Pi OS Bookworm (RPi 4 and RPi 5). Other OS versions may work but have not been verified.
Step 7 - Reboot
sudo reboot
After rebooting, the particle NetworkManager connection activates automatically and ppp0 comes up.
Step 8 - Verify the Connection
# Check that the 'particle' connection is active
nmcli connection show

# Confirm ppp0 is up and has an IP address
ip addr show ppp0

# Test cellular internet connectivity
ping -I ppp0 8.8.8.8
A successful ping confirms end-to-end cellular connectivity through the SoM.
Note: Wi-Fi and cellular can run simultaneously - the setup script does not disable Wi-Fi. To isolate cellular during testing: nmcli connection down <wifi-connection-name>.
Step 9 - Verify in the Particle Console
Navigate to console.particle.io, find your device, and open the Events tab. Look for:
| Event | When published |
|---|---|
tether/connected | On initial connection |
tether/heartbeat | Every 5 minutes while tethering is active |
The tether/heartbeat payload includes signal strength, uptime, and current state:
{"signal": 72, "uptime": 300, "state": "TETHERING_ACTIVE"}
You can also trigger a remote reconnect via the Particle CLI:
particle call <device-name> reconnect
What's Next
- Power Guide - battery, USB-C PD requirements, power modes, and Pi power control
- Hardware Overview - all connectors and interfaces explained
- Blueprint repo - fork and extend the tethering firmware